Autoclave Standard Operating Procedure
by Tannon Yu
Contents
LIVE STATUS
You can view the current status of the autoclave here.
Overview
 |
| Figure 1. FRONT VIEW. The right-hinged door's handle spokes are turned counter-clockwise to open. |
Our autoclave is a pressure chamber that utilizes pressurized superheated steam in order to sterilize loads, eliminating biological contaminants. Autoclaving is an essential part of our research work as it maintains the sterility that is absolutely necessary in microbiology. By minimizing contamination through sterilization, autoclaves mitigate unwanted variables in scientific research.
The fourth floor of the SERC building has at its disposal an autoclave from Consolidated Sterilizer Systems. While all laboratories on our floor are permitted to use the autoclave, the Şen Lab is responsible for overseeing and maintaining the overall health of the system. As such, we require that all users adhere to strict guidelines when operating the system.
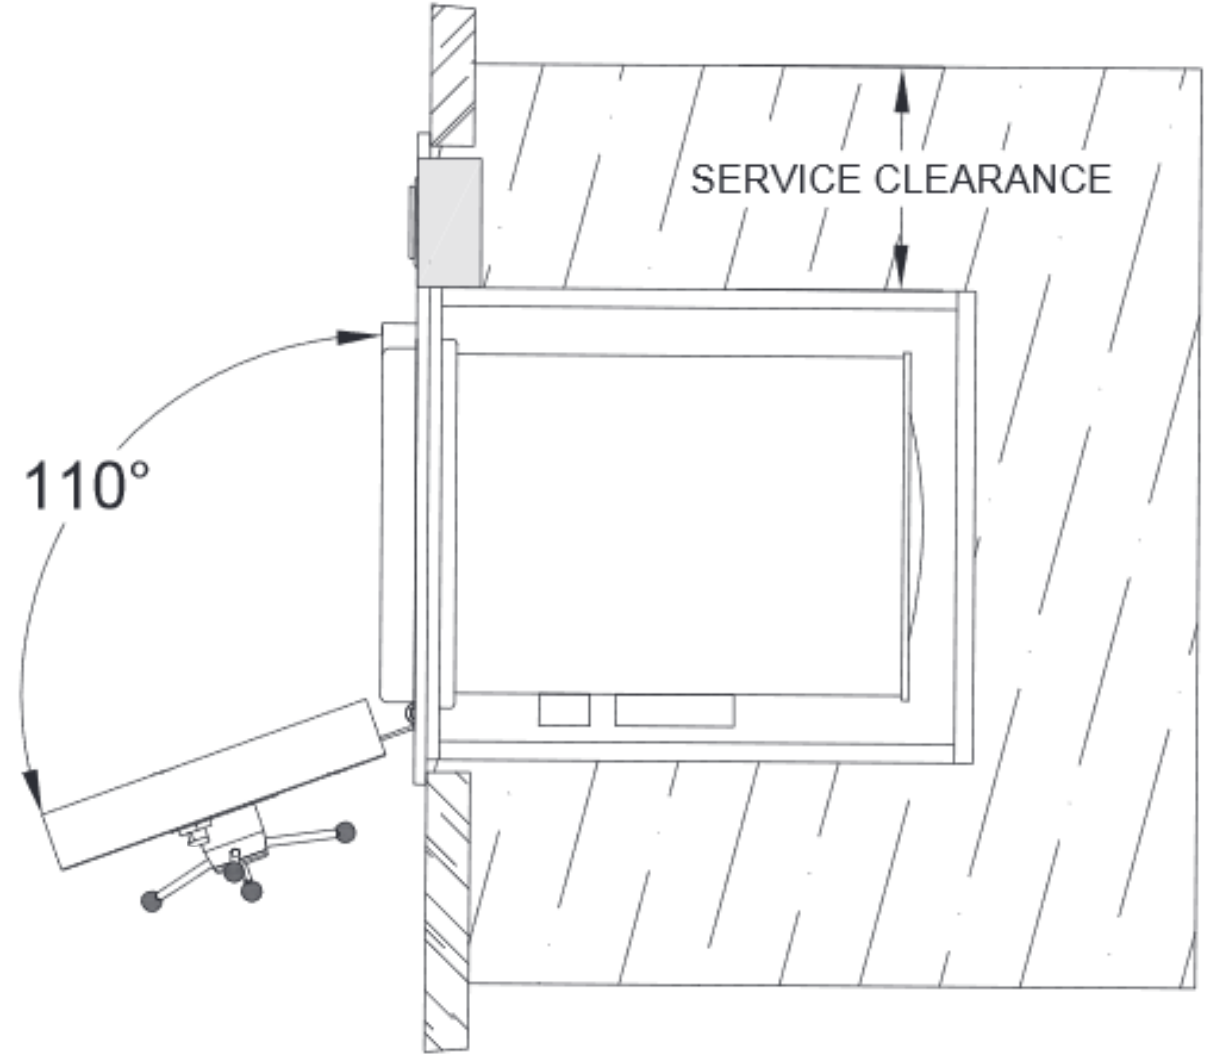 |
| Figure 2. TOP VIEW. A 24-inch area around the sides and back of the sterilizer must be cleared at all times. The autoclave door should not be opened beyond a 110° angle. |
The front side of the sterilizer system is shown in Figure 1. The main chamber features a vault-like three-spoked door which is turned counter-clockwise to open, and clockwise to seal. Directly above the door are three instrument gauge clusters for monitoring the temperatures and pressures of the chamber and jacket. On the left is the touch-enabled UI system for programming the sterilizer, the emergency E-STOP button, and a usage log printer.
The top of the sterilizer system is shown in Figure 2. While the chamber door is designed to accomodate an opening angle of up to 180°, it is recommended to keep the door opening angle within 110°. Surrounding the autoclave system is a demarcated area extending up to 24 inches from each side of the autoclave. This area must be clear at all times in case personnel must be called to service the system. Waste buckets and bags should be kept away from the service clearance area.
WARNING: Always use the provided heat gloves when placing or removing a load from the autoclave. Severe burns can result from touching the inside of the autoclave with bare skin.
Usage Guidelines
New users must receive training before they are cleared to use the sterilizer system. For training, contact thyu@uh.edu. To ensure minimal disruption in availability of the sterilizer system, all users should also be aware of the following guidelines:
- Load to be sterilized must be able to withstand extreme pressure and heat (up to 135 °C). Glassware is generally safe to autoclave. Please exercise caution when steam sterilizing plastics (polymers) as some are not designed to withstand autoclaving and can melt!
- Signing in before using the system is mandatory. This is to maintain records and accountability in the event of unexpected system failure. Repeated neglect to signing in will result in revocation of rights to the autoclave for the user.
- Load must be placed in a secondary container. A secondary container helps to prevent damage to the system should a spillage occur. The secondary container should also be filled with a small amount of water to prevent burning of the load underside.
- Do not tighten caps.
- Do not use the Gravity cycle for sterilizing liquids nor the Liquid cycle for solids. If this is done on accident, abort the cycle immediately and press the E-STOP button. Do not attempt to autoclave both liquids and solids at the same time.
- Ensure the chamber door is sealed sufficiently before starting the cycle. If steam blows out of the door after starting the cycle, tighten the door seal until steam is no longer escaping.
- Do not leave loads in the sterilizer overnight. Avoid starting cycles late in the day unless you or someone else will be available to remove the load.
- Do not use the autoclave for sterilizing waste.
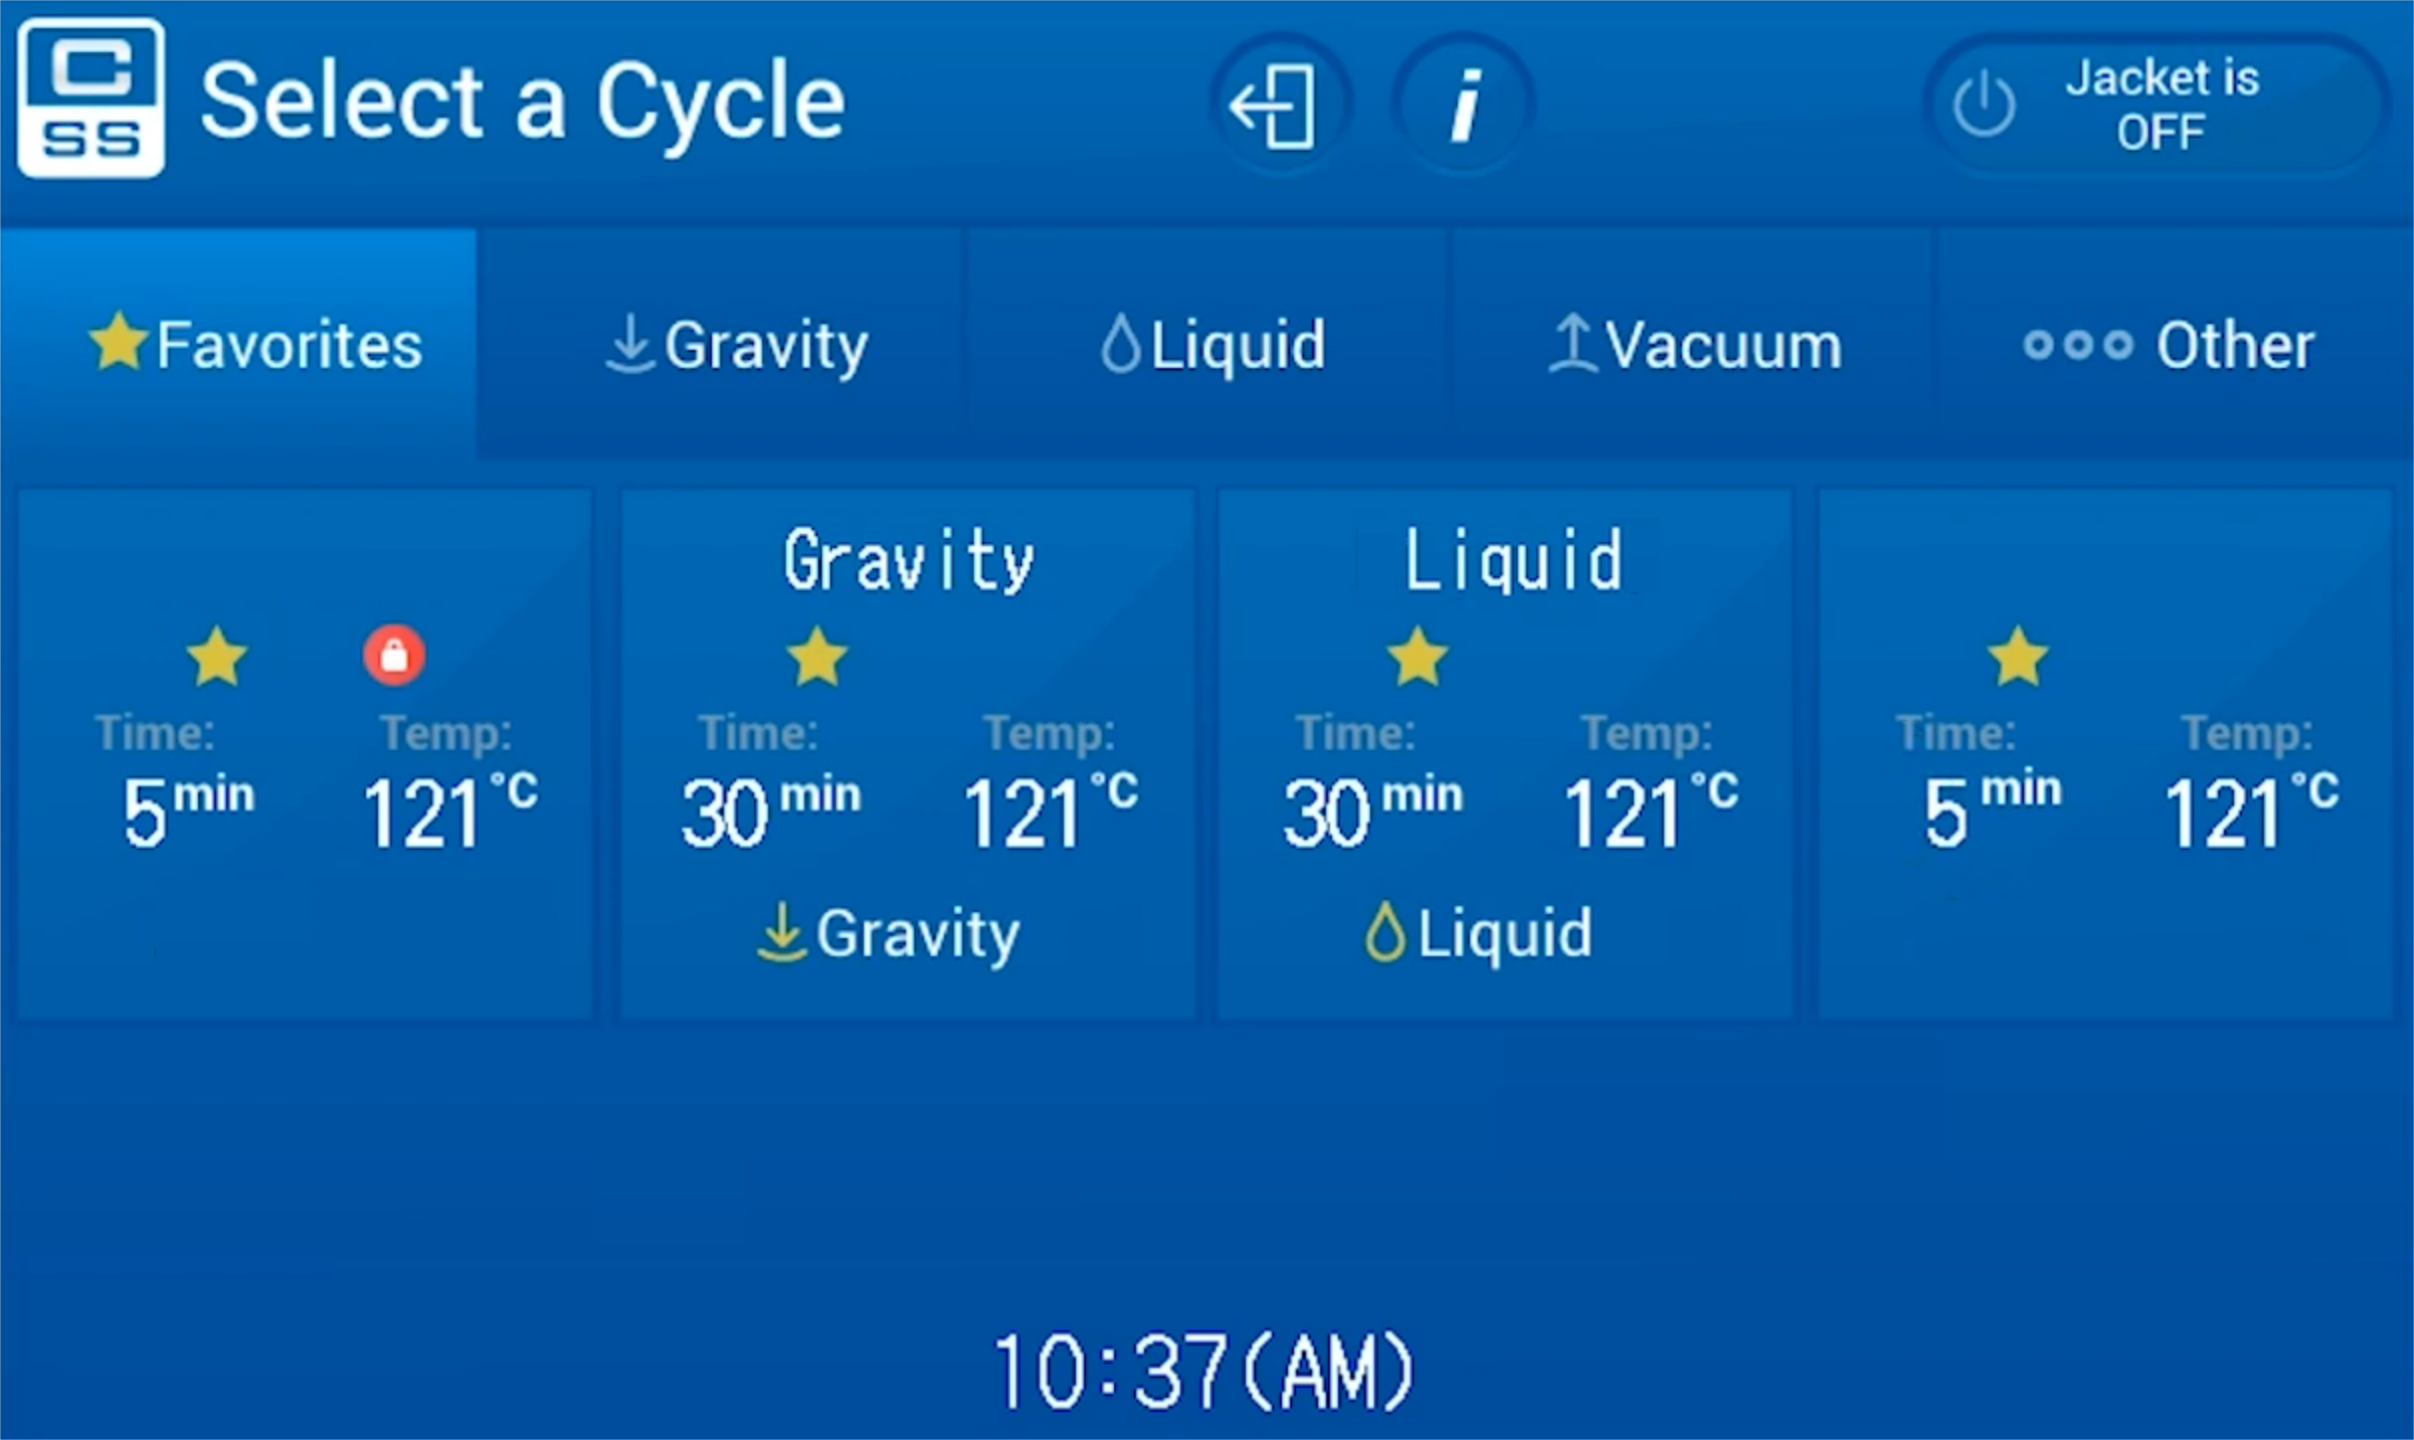 |
| Figure 3. Cycle selection screen. The UI is touch-enabled. Simply tap the appropriate cycle to proceed. |
Standard Operating Procedure
Preparations
- Check to make sure that all items in the load are autoclavable.
- Place load items into a secondary container that is lightly wetted with water.
- Ensure that any caps are only loosely attached. Do not tighten.
- Place autoclave indicator tape on load.
- For each use, sign in by filling out the mobile form.
- Turn the chamber door spokes counter-clockwise to open.
- Using heat gloves, carefully place load inside autoclave. Close the chamber door and turn the spokes clockwise to seal.
Starting the sterilization cycle
- Select the appropriate cycle depending on your load (Figure 3).
- For loads containing dry goods, glassware, and other solids, tap the Gravity cycle. The Gravity cycle utilizes a fast exhaust method which holds the chamber at a predetermined pressure and temperature.
- For loads containing liquids, tap the Liquid cycle. The Liquid cycle utilizes a slow exhaust method that prevents the liquid load from boiling and includes a cooling period.
- The temperature and cycle time can be customized, but the default setting of 121 °C for 30 minutes is recommended for both cycles.
- WARNING: Attempting to use a Gravity cycle for a liquid load will cause the liquid to boil over!
- Tap the green button (Figure 4, LEFT) to start the cycle.
 |
| Figure 4. LEFT. Tap to begin the selected sterilization cycle. RIGHT. Tap to abort the current sterilization cycle. After aborting, the autoclave must finish cooling before the chamber door can be opened. |
Removing load from autoclave
- Turn the chamber door spokes counter-clockwise slowly and with extreme care. Superheated steam buildup will release spontaneously and can be hazardous.
- Using heat gloves, carefully remove the load from the chamber and close the chamber door.
Aborting cycle and emergency stop
- To abort a cycle, tap the red button (Figure 4, RIGHT). Note that if you abort a cycle, you will still have to wait for the sterilizer to finish cooling before you can open the chamber door.
- In case of emergency, hit the E-STOP button directly below the touchscreen UI. This will immediately cut the power to the sterilization system. To restore power, twist the E-STOP button to return it back to its original position.